Wednesday, March 2, 2016

How to Catch a Leprechaun

If you are looking for something fun to do with your little one for St. Patrick's Day, try to catch a leprechaun with them.

  • Pot of Gold
  • Box or trap (optional)
  • Another Adult

The idea is that you mysteriously "find" a leprechaun's pot of gold and want to try and catch him for a wish when he comes back for the pot of gold.
We have done this 2 years in a row and this year will be the third. It is fun and keeps children's imagination active. They grow up so quickly, you will be glad you took time out to do fun silly things like this that they will remember.

The year before last we placed a pot of gold (plastic gold coins in a plastic cauldron) in the living room and waited for our daughter to find it. Once she did and asked about it, we spun the story of how a leprechaun must have left it and how we should try and catch him when he comes back for it.
We then let her hide the pot of gold in a different spot and split up to look for him in the house. 

If you live in a 2 story home, a great effect to try is to hide the gold upstairs and have one adult go downstairs with the child to look for the leprechaun. Once downstairs the adult who remained upstairs should run quickly with short steps from one room to the room where the pot of gold was hidden. The adult upstairs should then grab the hidden pot of gold (we leave one gold piece or wrapped chocolate piece as a treat or memento to keep) and sneak the pot out of the room and slam the door.
From downstairs it sounds as if the "leprechaun" is running back to get his pot of gold. If done well, when the child and adult from downstairs get back upstairs the pot of gold is gone with one piece left for the child to keep from the quick getaway. 

Last year we weren't in the same place so we had to get a little creative. We made a trap for the leprechaun and placed the found pot of gold in the trap. When she got busy the pot of gold was taken and the trap was set off. She then came back into the room and found that dastardly leprechaun had escaped again.


Our daughter played a little song for luck to try and catch the leprechaun last year.

Sunday, January 10, 2016

Create your own DIY Cat Scratching Post for $2

My cats starting using the couch as a scratching post since I moved. As you can imagine, this is not a good thing in my eyes. This, of course, was my fault because I didn't want to bring their old beat up scratching post with us.  Being low on funds I decided to make them a scratching post so onward to Pinterest I went. I did a take on this one.

Materials needed
  • Cardboard (about 4 medium size boxes)
  • Scissors 
  • Glue (I used a craft liquid adhesive but hot glue will work)
  • Paper Cutter
  • Catnip (optional)


I had to buy the glue and scissors. This was the only cost to me. If you have these on hand your DIY cat scratching box can be free!

I didn't end up using the big pots and pans cardboard box but included it in the picture because I wasn't sure how much I would need.

Set one box aside as this is the one you will be lining. Take measurements as you will need to cut the strips to fit inside this box.

Then break down the rest of your cardboard and get to cutting.


I used the paper cutter for measuring the strips and for cutting. Since cardboard is thicker than paper, I had to flip the cardboard and slice each side. Then the pieces were easy to snap off by folding each side where the slice was. I made the width 2 inches. The scissors were used to cut the length to match the interior of the box.

Now that you have some pieces, start filling your box. You can glue the sides of the pieces together as you go. I did the glue all together at the end.

Once the glue is dry, sprinkle in a little catnip to get your cats interested and a scratching they will go. Thus far the cats love the new scratcher and have not put their nails in the couch.

I also left the height of my box higher and didn't make it flush with the strips. This way the kitties could still sit inside the box.

I think I need to make one for each.


Drunk-Proof-It
This took me the better part of 5 hours. Granted, breaks were taken, phone calls were made and cigarettes were smoked but still, save your time and buy a scratching post from Wal-Mart for $10.

Sunday, January 3, 2016

How to Hand Paint a Guitar

Items need:
  •          Guitar
  •          Paint (I used acrylic)
  •          Lacquer or paint sealer (I used a spray on kind)
  •          Paintbrushes
  •          Guitar Strings
  •          Painter’s Tape

You will first need to remove the strings that are currently on the guitar if any.  I didn’t sand down the guitar although you are more than welcome to. 

This is a photo my daughter took of the guitar before anything was done to it:


Select your design, I chose a cute LPS mouse because my daughter likes Littlest Pet Shop. Print this off as a reference, unless you are a better artist than I.

I then painted a base coat on the front of the guitar. Once you have a couple of coats down for you base coat you can start on your design.

Start with the basic shapes of your design in the colors. For example I did the basic shapes of the mouse in grey and the cheese in light yellow. Then do the detail colors, leaving the black outline for last. For me the next detail layer was the white tummy, pink ears, white and blue for the eyes, pink hands and feet, then dark yellow for the cheese. Trust me, once you get that last layer of black outline on, it will look great. Make sure to let the paint dry between each layer. 

Finished painting:


Lastly I coated the guitar with a spray on lacquer. A friend was kind enough to restring the guitar.

Thank you for reading! Enjoy this rendition of the 5 little pumpkins:


Saturday, December 26, 2015

Animal Jam Perler Beaded Reindeer, Fox and Owl

This is how my Animal Jam perler beads came out:
My daughter loves Animal Jam so when I found the pattern for these on their blog I had to make them. 
Click on the animal for the pattern:


Saturday, December 19, 2015

DIY Snow Globes

I found this great DIY snow-globes instructions here that I copied.

Materials needed:
Epoxy - I used Gorilla Glue
Glass jars with lids - I re-used salsa and sauce jars
Glitter
Glycerin 
Figurines


For the first step epoxy the figurine down on the lid. I specifically didn't center Mickey because of the view I wanted for the completed look. Let that dry.

Next add 1-2 tablespoons of glitter to the empty jar. I did a mix of small and big glitter. Then fill with water and add only a drop of glycerin.

Afterwards screw on the lid. The jars didn't leak but I still hot glued the surrounding edge just in case. I topped the lids with fabric so you couldn't tell which salsa jar was which. 

They turned out really cute!
I can't find the finished photos but they exist and turned out great. 

Sunday, November 22, 2015

Christmas Presents for under $8

$Eight dollar Christmas present for 6 people
This can be a child involved, thoughtful and cheap present.  Without a child it is just a cheap present.
Items needed:
Dirt, Pot, Paint, Paintbrush, Plant, and child labor
Notes for the “items needed” can be found at the bottom of the post. 
First create an area for your child to paint, think how “Dexter” staged the apartment of his first victim way back in that first season. 
Please note your child will get paint somewhere they weren’t supposed to no matter how much newspaper or wax paper you lay down.  I believe this concept is considered Murphy’s Law.  Just accept it as fact and move forward with life.  A little color never hurt anyone.
Use the child labor to paint however many pots you will be using as presents with the paintbrushes.  While this is in progress, pour yourself a drink and relax.  You deserve it.
We turned the pots upside down but my free labor didn’t understand that the pots would be in the opposite direction afterwards.  If you go this route let the labor know which direction the art will be viewed from once completed.
Once the paint on the pots is dry, fill them with dirt and plant your plants.  Depending on the age of your slave you can even have them complete this portion as well while you have another drink. 


Dirt – Which can be taken from outside (you know that place we used to go before the internet) or purchased.  I advise purchasing so that you don’t have to till or fertilize the outside stuff.  Mine cost $3 from Wal-mart.  I believe it to be discounted because it was winter.
Pot/Pots – [insert marijuana joke here].  Get what pots are available from the Dollar Tree but terracotta with a drainage hole in the bottom would probably work best.  Mine cost $5 because I bought five.
Paint/Paints – I used the Acrylic variety because I already had them so I consider this another “free” element of this craft.  You can use whatever type and color you want Sparkles.  Yes I called you Sparkles.
Plant/Plants – I used spider plants because they are fairly hardy indoor plants.  Another bonus is mine propagated and I didn’t have fork over any moola on new ones.  Another idea is to also get these from that outside place but only if you know what in the hell you are doing.  No person would appreciate receiving poison ivy except for possibly Poison Ivy.
Paintbrushes - Finger painting will also work if you aren’t such a control freak that you dictate how your child makes art. 

Child labor – This is optional but vital if you want the receiver to actually enjoy your present.  Not a single soul cares how good your macramé necklaces are now that you are grown.  If you are doing crafts after the age of 13, you better be bringing some serious art or function.  What’s that you say?  I am hypocrite because my site is dedicated to DIY crafts.  Not so, Sparkles, not so. My site is dedicated to documenting my alcoholic activities which is the distinction. 

Sunday, November 15, 2015

DIY Soap

Christmas is terrible.  You always spend too much and people don’t want the crappy scarf you bought them for $50.  No matter what they say.  Instead spend time with your family and friends and stop buying crappy presents, unless you are rich.  Then indeed buy away.  I will gladly take a diamond tennis bracelet for a present.
As Christmas time was rolling around this year I decided I didn’t want to focus of the material value and commercialization of what Christmas normally is to people nowadays.  In place of buying things that leave much to be desired in my loved ones life and leave my bank account empty, I was going to create items that would make this time of year less stressful for me.  With less stress I may actually have some holiday spirit instead of spending obscene amounts at the mall with worry. I decided I was going to place a value on what I created for the time that I put into them. 
TLDR: Christmas sucks now so I handmade all of my presents this past year for under $60 total.
So let’s get to crafting


Items needed:
·         Glycerin Soap
·         Essential oils (fragrance)
·         Molds
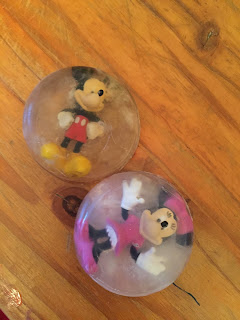
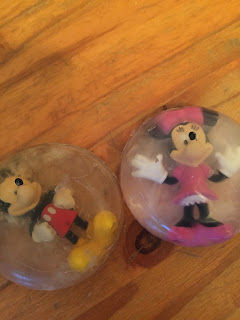
·         Small toys or inserts
·         Microwave safe bowl


I bought pre-made soap bars that you can melt in the microwave.  Simply cut in cubes and toss in a microwave safe bowl.  Then microwave for the time indicated on the instructions.


Once out of the microwave add whatever fragrance you choose.  I picked vanilla and grapefruit essential oils as I already had those on hand.

Add inserts/toys into molds and slowly pour soap over them.


Once dry you will be able to pop out.


Drunk Proof It or ways it could have been better.  This is drunken arts and crafts not artisanal arts and crafts.  These are crafts that I try and sometimes fail at.  I am not a professional.  Please try it at home; results may vary if you are sober.
1.       Most of the soaps seemed “bubbly” probably from stirring in the essential oils too quickly.  Go Slow
2.       If I wasn’t trying to keep the budget so low I would also have also sprung for some soap dye / coloring.  The vanilla did tint the soap.
3.       These molds were tipsy.  If I had it to do over again I would have purchased a completely flat mold.  It would have also been doable if I had a sandbox or something along those lines to set the mold in while pouring and drying.
4.       I found that while microwaving the sides quickly became hard while stirring in the essential oils.
5.       I didn’t check the size to mold ratio on some of the inserts. This meant that Woody’s hat stuck out the back of his soap mold.
6.       Last tip don’t wrap these in tissue paper as it will stick.  Wrap in wax paper or put in an cellophane wrapper.
I hope this helps.   This was probably the most expensive of the Christmas crafts as I had to buy the soap, molds and inserts.  The mold was about $5, the soap around $9 and the inserts were less than $1 each.
You can see the rest of the cheaper sets from this past Christmas to come on the blog later this month.


Btw:  I only went to the mall once during the Christmas season to get photos taken with Santa.  This made me happy.